
Payment Applications
A Payment Application is the foundation for accepting payments through the payment gateway. Each application has its own Client ID, webhook settings, and supported currencies.
What is a Payment Application?
A Payment Application represents a unique integration point for your business. You might create different applications for:
- Different websites or brands
- Different business units or departments
- Separate integrations with distinct webhook endpoints
Each application provides:
- A unique Client ID (32-character identifier)
- An individual webhook callback URL
- Custom currency whitelist configuration
- Payment settings (overpay/underpay handling)
Creating an Application
Via Dashboard
- Log in to your merchant dashboard
- Navigate to Payment Applications from the main menu
- Click Create New Application
- Fill in the configuration fields (see below)
- Save and store your Client ID securely
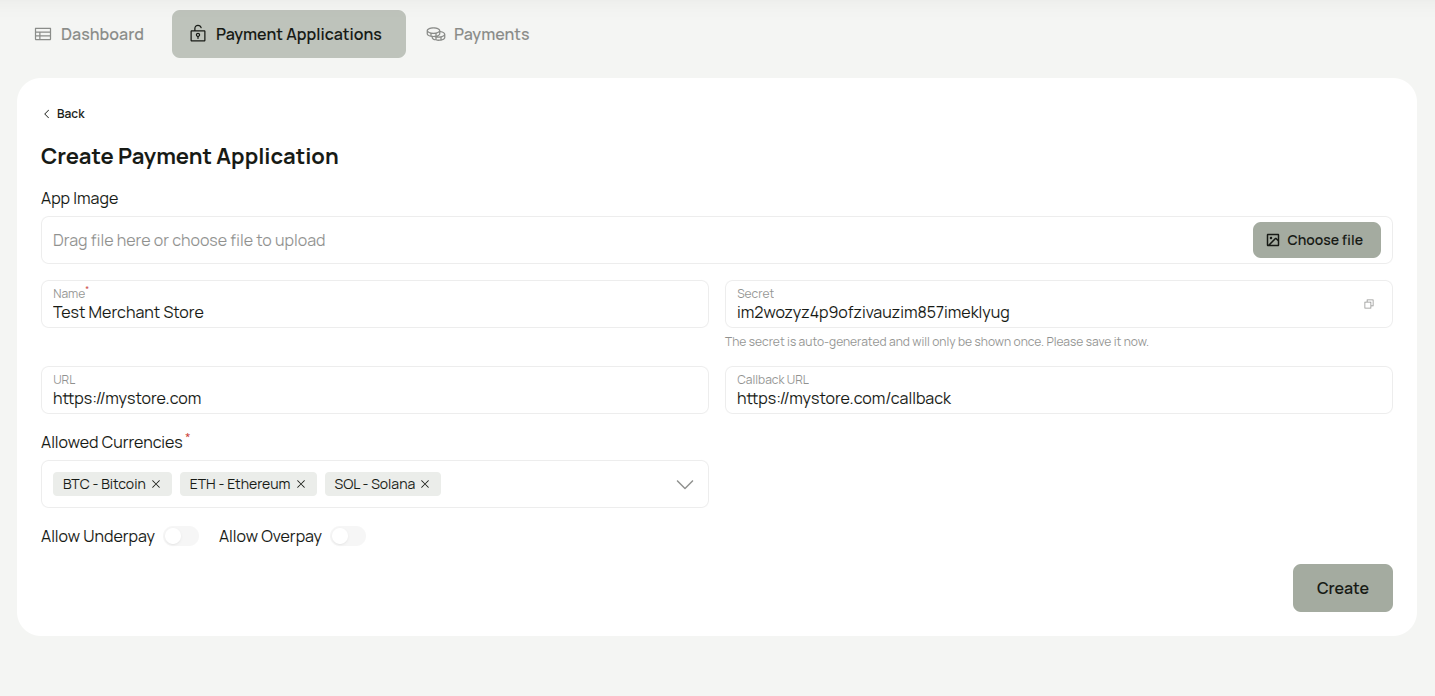
Important: The Secret is auto-generated and will only be shown once during creation. Copy and store it securely before saving — you will not be able to view it again.
Via API
POST /api/payment-applications
Authorization: Bearer YOUR_OAUTH_TOKEN
Content-Type: application/json
{
  "name": "My E-commerce Store",
  "secret": "your_webhook_secret",
  "url": "https://mystore.com",
  "callbackUrl": "https://mystore.com/webhooks/payments",
  "currencyWhitelist": ["BTC", "ETH", "USDT"],
  "allowUnderpay": false,
  "allowOverpay": true
}
Response:
{
  "data": {
    "id": "550e8400-e29b-41d4-a716-446655440000",
    "name": "My E-commerce Store",
    "clientId": "a1b2c3d4e5f6g7h8i9j0k1l2m3n4o5p6",
    "userId": "user-uuid",
    "site": {
      "id": "site-uuid",
      "title": "My E-commerce Store",
      "url": "https://mystore.com",
      "callbackUrl": "https://mystore.com/webhooks/payments",
      "setting": {
        "id": "setting-uuid",
        "title": "Default Settings",
        "allowOverpay": true,
        "allowUnderpay": false
      }
    },
    "currencyWhitelist": ["BTC", "ETH", "USDT"],
    "createdAt": "2026-01-15T10:00:00Z"
  }
}
Configuration Fields
| Field | Required | Description |
|---|---|---|
name | Yes | A descriptive name (e.g., "My E-commerce Store") |
secret | Yes | Webhook signing secret for HMAC-SHA256 verification |
url | No | Your website or application URL |
callbackUrl | No | Webhook endpoint for payment notifications |
currencyWhitelist | No | Which cryptocurrencies to accept (defaults to all) |
allowOverpay | No | Accept payments that exceed the requested amount |
allowUnderpay | No | Accept payments below the requested amount |
Payment Settings
allowOverpay — When enabled, payments exceeding the requested amount are still marked as completed.
allowUnderpay — When enabled, partial payments are accepted. When disabled (default), underpaid transactions trigger the payment.underpaid webhook event.
Webhook Configuration
The secret is used to generate HMAC-SHA256 signatures for webhook payloads sent to your callbackUrl. See the Webhook Security guide for verification details.
Currency Whitelist
The currencyWhitelist array determines which cryptocurrencies customers can use on the checkout page. See the Currency Configuration guide for available currencies and best practices.
Managing Applications
List All Applications
GET /api/payment-applications
Authorization: Bearer YOUR_OAUTH_TOKEN
Get Application Details
GET /api/payment-applications/{id}
Authorization: Bearer YOUR_OAUTH_TOKEN
Update Application
PUT /api/payment-applications/{id}
Authorization: Bearer YOUR_OAUTH_TOKEN
Content-Type: application/json

{
  "name": "Updated Store Name",
  "currencyWhitelist": ["BTC", "ETH", "USDT", "USDC"]
}
All fields are optional — only include the ones you want to update.
Delete Application
DELETE /api/payment-applications/{id}
Authorization: Bearer YOUR_OAUTH_TOKEN
Soft-deletes the application. Historical payment records are preserved.
Restore Deleted Application
POST /api/payment-applications/{id}/restore
Authorization: Bearer YOUR_OAUTH_TOKEN
Best Practices
- Use descriptive names — makes it easy to identify applications in the dashboard
- Set a strong webhook secret — used to verify webhook signatures
- Limit currency scope — only enable the cryptocurrencies you actively want to accept
- Store credentials securely — keep Client IDs in environment variables
- Start conservative — disable underpayment acceptance initially
Next Steps
- Set up authentication for server-to-server API calls
- Configure supported currencies
- Set up webhooks for payment notifications
- Create your first payment